VBGamer
Using Zip Files In VB Part 1Adding Files To The ProjectFile MoveBefore we add the zlib files to the project, we need to move some of the files first. Depending on where your project is located and where you unzipped the zlib source code, you may need to make some adjustments by moving essential files into your VC++ project's folder, or at least near it to make including files easier.I have the following directory structure for my project.
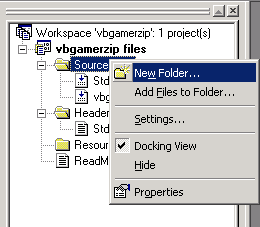
The files you need to move are listed below. The most important move is to move the needed files from the "minizip" folder to the folder containing the zlib files. For my project I copied the files from "minizip" to the "zlib122" folder. Optionally you can copy the contents of zlib122 and minizip to the vbgamer zipfolder. It's your choice, but you'll need to know the relative location of the zlib code (in this case ..zlib122) to the vbgamerzip folder. Organizing The FilesBack to VC++. Now that you've moved the essential files (listedbelow), the next step is to add them to the VC++ project. You don't need to orangize them as I have, so organize the files however you want.If you don't have the Workspace window open, press Alt+0 (number zero) to open it. In the File View tab, right click on the "SourceFiles" folder and then select "New Folder..." from the menu.  I used the name "Zlib Source" for this first folder. This doesn't create a folder on your hard drive, this is simply an organization tool within VC++. Next, right click on the folder you just created and then select "Add Files to Folder..." from the menu. Find the folder that contains your zlib files and add the following files to this folder. Note, you won't need all files in the folder. Make sure you only add the files in these lists.
Under the "Source Files" folder create a new folder called "Minizip Source" and then add the following files.
Next, create a new folder under "Header Files" called "Minizip Header." Add the following files:
TestingWe're not finished, but to make sure everything works, so let's do a test compile of our DLL.On the toolbar in VC++ there should be a dropdown combo box that allowsyou select either Win32 Release or Win32 Debug. Since we don't need a debug version of this DLL, lets select Win32 Release from the list. You can then click the Build button on the toolbar or select "Build vbgamerzip.dll" from the Build menu. If you did everthing correctly, there should be a file named "vbgamerzip.dll" in the"vbgamerzip/release" folder. If there were any errors reported, go back over the tutorial to make sure you did everything correctly. Next: Creating The VB Wrapper | 1 | 2 | 3 | 4 | 5 | 6 | 7 | 8 2 comments |
|